DIY silk scarves
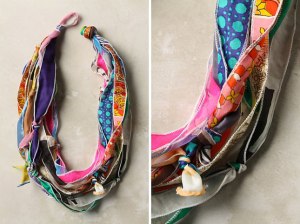
Having a wrinkly, cold neck is totally uncool. DIY silk scarves are the perfect solution for jazzing up a dull outfit and for hiding some imperfections. You can keep your looks trendy and interesting simply by making a silk scarf with interesting patterns and colours. Fabric stores keep a wonderful variety of fabrics used for scarves. Silk is sold in different widths. These fabric shops know how to rip the fabric across and then lengthwise for DIY silk scarves. You will then have to sew in your scarf hems. Some people iron the hems around the scarf before sewing them, while others hand roll the hem and then sew. If you use a loose whip stitch, you can cleverly hide your stitches in the fabric created by the hems. Wash your scarf gently, iron it and wear. As you wear your scarf with any outfit you like, you’ll see, feel and look stylish, transforming ho-hum looks into an attractive eye-catching neck-piece.
DIY clothing refashion ideas
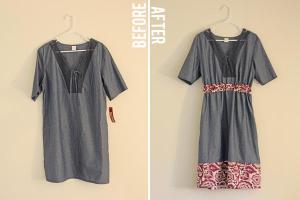
It’s always very sad when you outgrow that favourite t-shirt or sweater, sometimes you cannot get another like it, either because they went out of stock or it was specially made just for you. Well with the advent of DIY clothing refashion you can now have a little more time with that favourite shirt, jeans or sweater. DIY clothing refashion involves some very creative and easy ways to transform clothes that might have been considered as waste into functional household items or clothes. The most popular clothing refashion in recent times involves the use of old denim jeans to make items such as bags, backpacks, placemats, cup holders, dish racks, the list is endless really. There are also many ways to transform that tight t-shirt or sweater into something unique and stylish just by cutting out the back and adding a little lace. Your old sweatshirt could also switch roles and serve you as a skirt just by tying a cute bow on your waist. So next time you have some old clothes that you are thinking of throwing away just try a DIY refashion on it, it is easy and needs no special skills to complete.
Cool DIY – Fashion Revamp Without the Hassle of Sewing

I have recently discovered easy no sew diy hacks. So, I am going to tell you about my favourite cool DIY tricks to update your wardrobe.
1. Grab an old jumper or tee and cut it straight down the middle. Using a bit of hem tape you have created a funky cardigan.
2. Got singlet tops in every colour? Grab a doily and fix it! All you need to do is fold the doily in half and place it on the neckline of your singlet. Using some self-adhesive tape, simply iron the doily in place.
3. Are you the type of person that always has to roll up their jeans? If you want to add to this look all you need a some bling and a hot glue gun. Simply pick your accessory of choice and get to work gluing them to the cuff of your turned up jeans.
4. Open back sweaters? Using the same technique as we did in number 1, with the cardigan, slit an old jumper straight down the middle but at the back this time. Then using the hemming tape again, fold the edges over to prevent fraying. Then simply add 3 inches of velcro to the neck of the sweater. Slide your arms in and attach the velcro.
5. Have shirts that you no longer wear? Create two mirror images of half moon shapes. Place them just under the collar of your shirt, trace and cut out the shapes. In order to straighten the edges make small snips in the fabric and glue to the inside of your shirt. Iron and you are ready to go with an on-trend new look.
In order to create these cool DIY looks all you need is a pair of scissors, a hot glue gun, and some inspiration.
DIY House Projects Take on a New Twist

I’ve told you before that a group of us meet on Sundays, coming together with lots of crafty ideas for DIY house projects and other fabulous items. Last Sunday, one of the ladies in the group came along wearing a really pretty crocheted top. There wasn’t much to it really – it looked almost hippie inspired but we all agreed that we wanted to each make ourselves one of these crocheted tops but in different colours. With sleeves or sleeveless, they look cool with jeans or a long skirt. Suddenly there’s a feverish excitement in our group to get them done while we still have the weather to wear them. We’re moving a bit away from DIY house projects and concentrating on crochet supplies for now – crochet hooks, yarn, cotton fibre and other materials we could use, I fancy silk! Certainly generated a lot of conversation and interest. There is even a younger girl in our group who says she’s making herself a crocheted bikini for when she goes on holiday to the Seychelles; anyone got any patterns for bikinis? Found a few on Pinterest but not sure if you could actually swim in them…mind you I think it is just for posing in!
Add some Interest to Your Wool Garments
Natural dyeing making use of native Australian plants is exciting on silk fabrics for starters, but did you know that you can even get wool ready for natural dyeing? For colder days, why not move fabric dyeing to wool and liven up some of your dreary cardigans? Belinda Evans of Alchemy teaches one how to prepare wool and make it colourfast and even how to collect and prepare native plant materials for yarn dyeing. The great thing is you can attend a class and be inspired by others or you can pick up some tips and info online.
The easy peasy part is that you simply make use of some equipment and ingredients that you no doubt have in your kitchen already. The techniques you learn with Belinda Evans will work on new or old wool. When you attend a course such as this one by Belinda, make sure to wear items of clothing that you aren’t going to mind if they get some splashes of dye on. You’ll take home some samples of yarn and fabric complete with information and notes on the preparation, mordanting and dyeing process for wool. Lasting just one day, these courses are a great way for beginners to learn just a bit more to add some awesome interest to your wool garments.
Eco Dyeing – we can all do it.

Hand Dyed Silk Scarf
There has been a lot about eco dyeing in recent years. In my background reading I found some wonderful blogs that are ageless, the information relevant when ever it was written.I will include the ones I found most interesting in the links below.
Dyeing with plants is as old as wearing garments, maybe an accidental discovery or deliberate who knows but what we do know is with the onset of fashion and chemicals and business opportunities it fell more and more into the background.This is slowly changing as sustainable and green approaches as being seen a way forward. Not only for the fringe or extremists but for everyone.
Natalie Billing Australian artist is very popular with the Queensland Spinners, Weavers, and Fibre Artists an excellent organisation founded in 1969; has held a number of training days and workshops on botanical dyeing. I missed two this past year I am so annoyed about that. Need to watch out for them next year thats for sure. This artist not only uses the plants for dyeing but also the leaves themselves for use in her art. This blog has an interesting tutorial on extracting dyes and this blog, Threadbourne for step by step instructions and a host of fascinating information.
I thought it might be interesting to list all the different plants that you can grow and use to make dyes so that is on the agenda for next post.
Now I want to end with a cautionary tale – be careful what pans you use for dyeing because it can damage them… I have had to purchase a whole new set of pans for my mum because I ruined hers. I guess asking her first might have been a good idea. Thanks to payday247.com.au she has a new set of pots for the kitchen and while I was at it I have some for my dyeing processes.
Finger Weaving Gorgeous Peasant Braids
As I’ve said, colour and fibre have been part of my life, and meeting once a month on a Sunday has opened up a fantastic time of like-minded brilliance. Last time somebody came up with this awesome ides of finger weaving peasant braids. Use gorgeous colourful braids, seen a lot in Peru, can be used for making things like book markers, watch straps, chokers, scarves, sashes and even dresses and headwear. Before you know it, with some simple hand tools, you’ll be weaving exquisite blankets and garments. In Peru they even try to keep these ancient weaving techniques.

Finger weaving I’ve since discovered is a process of making woven cloth by simply using your fingers. As well as actually being a simple form of weaving and you can manipulate certain colours of yarn with your fingers. What I absolutely love is that finger weaving can be done anywhere. If you’re traveling and not doing the driving, you can be weaving. Of course the easiest patterns to make in finger weaving are diagonal bands of colour. I’m told that once the principle of separating the warp ends and inserting the wefts has been achieved, diamond patterns for instance can be worked by grouping the yarn differently and weaving it in two directions.
Fiber Painting – Is it Fiber Art?
Fiber Art is something that takes a lot of creativity. In my last post I talked about scarves with art. So what exactly is Fiber Art? The depiction of art on fiber is known as fiber art.

Yes Fiber painting is the most exotic of all sub categories of fiber art. Just making a painting will increase the exotic value of the cloth piece. Is it not? Mostly Fiber Art is considered to be related to stitching or coloring but painting is an invariable part of this art form.
It can be painting on a cloth or using stitching to make a painting. In the latter method we use colored threads instead of paint. It is really beautiful to look at. It is called as embroidery sometimes, but Fiber painting is more than just embroidery. See in the picture besides, is it embroidery? No, it is Fiber Painting and it is much better than printing.
Hand made Fiber painting on cloth which are worn as sarees are very famous in India.

You want to have a loom at such exquisite art, just walk into the local store and ask for madhubani painting art and you will get it. The colors used are all natural. If you do not find it at the local store just order online and get these art pieces delivered to your door steps. These are really beautiful pieces with hand-made paintings to adorn them. Every piece is unique and custom-made. It is not printed but painted by hand.
My love for scarves
There is no denying that scarves can really turn an outfit around. You can even wear the same pair of pants for three days in a row, but as long as you change the scarves to add a little more character to your clothes, you will be just fine.
The trick is to make sure that you coordinate the clothes well. You can go for an incredibly hippy-chic, or ethnic look with the right scarf.

In case that is not your game, you can always choose a really modern style as well. A number of linen and silk scarves come in bold and modern prints- ones that the mod lover in you will always cherish.

In fact, I am a huge fan of wearing scarves as turbans as well. Of course, this is not an everyday style- it’s more of a unique opportunity for the right party. It is edgy, unique and will certainly make you stand out.

Lastly, if you are planning on wearing scarves with your clothes, you have to make sure that the rest of your outfit is solid. The focus should be on the scarf, so wear simple, or plain clothes underneath, so that it does not appear startling.
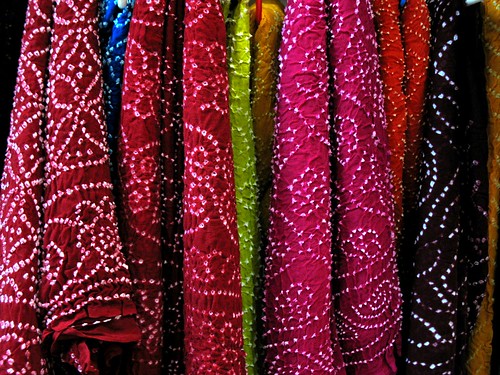
Tie and Dye with Bandhani
The tying of cloth and then dyeing it is the oldest form of creating patterns on cloth. It is a very popular form of dyeing in Indian states of Gujarat and Rajasthan. “Bandhani” which is a hindi word for tying has developed into art over many centuries.
The Bandhani Art
What is Bandhani?
It is an ancient technique of dyeing. It involves two stages. First is Tying the cloth which may be silk or cotton and then immersing in colour. The technique is closely knit in the social structure.Each group of people have different styles and have made the patterns their own. The colours used in the dyeing process are mostly naturally extracted. The colours used are mainly dark and majority are shades of yellow, purple or red.
Making of the Saree
The first step is to bleach the cloth and prepare it for dyeing. Then it is sent to women workers who do the most important part – tying. This is the most painful part. The ties are created as small as a dot to large circles and waves.
After the tying the dyeing is done. The male workers do this part. The cloth which has been tied is dipped into dyes of various colours starting with light colours. It is a homemade process and still a handicraft. There are many patterns like “Laheria” – wavy or printing of gold and silver dust known as “Khari”. For obtaining a checkered pattern the cloth is rolled diagonally to get the right pattern.
Significance of Colours
The colours used are yellow, red, green, black and pink. Each colour has its own meaning. The red colour symbolises marriage, the saffron colour the yogi while yellow means spring season.
